Sunday, October 31, 2010

Week 23 -- October 28, 2010


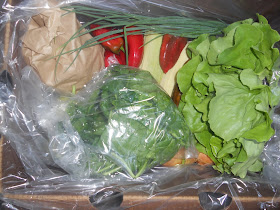
Here is this week's box:


In this week's box: brussels sprouts, cilantro, green leaf lettuce, green pippin apples, heirloom tomatoes, olympic onions, spicy serrano peppers, summer squash, sweet peppers, and watermelon radish. Check in later this week to see what I make.

Saturday, October 23, 2010

Rustic Tart with Roasted Peppers & Tomatoes

One of my goals when I started this blog was to learn how to make a savory tart. It seems like the perfect thing to do with seasonal vegetables. I studied several different types of tart crusts and galette crusts. Then, I came across a recipe that used puff pastry for the crust. Yes, puff pastry, that stuff you can find in the freezer section of almost any grocery store. Thaw it, roll it out the way you like, and you have a nice buttery crust.


I have been reading The Improvisational Cook by Sally Schneider. I really like it because each recipe starts with a basic recipe and then there are several things you can do with that basic recipe. I love learning new techniques and then improvising; so, I am really enjoying this cookbook.


One of the master recipes is for slow cooked tomatoes. I had some tomatoes in my box and so I sprinkled salt, pepper, olive oil, and a bit of sugar on them and cook them at 325 degrees for about 2 hours.


Another master recipe was for magic peppers. These are red and/or yellow peppers cooked at 425 degrees for about 30 minutes. The thing that make the peppers magic is the heat and also the seasoning. Ms. Schneider recommends the following spices singly or in combination: fresh thyme or rosemary; fennel, cumin, or cracked coriander seeds; sweet-picante paprika or smoky pimenton de la Vera from Spain.


I had some Hungarian sweet paprika so I sprinkled some on the peppers along with olive oil and salt and pepper.


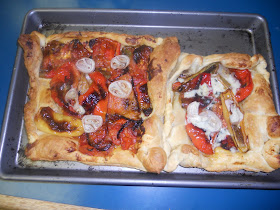
I assembled the tarts -- adding a bit of sliced shallots and an extra sprinkling of olive oil and kosher salt on top. I baked the tarts at 400 degrees for about 25 minutes.


And, then I had these delicious tarts. This is a really easy recipe and it looks like you had to take a cooking class to learn how to make it. I think to simplify this recipe you could roast the tomatoes and peppers together at 450 degrees for about 30 minutes.


Serve it with a basic green salad. And, look, it's like you're dining at the Cafe at Chez Panisse without having to travel to Berkeley.

Rustic Tart with Roasted Peppers & Tomatoes
Adapted from The Improvisational Cook by Sally Schneider

1 pound ripe tomatoes
A pinch of sugar
3-4 tablespoons extra virgin olive oil
Kosher salt
4 large red or yellow peppers, or a combination
Black pepper
Seasonings, singly or in combination, such as fresh thyme or rosemary; fennel, cumin, or cracked coriander seeds; sweet-picante paprika or smoky pimenton de la Vera from Spain
1/2 of a 14 ounce package of frozen puff pastry dough
1 shallot, thinly sliced

NOTE: I think you can roast the tomatoes and peppers together at 450 degrees for 30 minutes and then add them to the tart. This would be a good way to turn this into a weekday dinner.

1. Thaw 1/2 of the dough in the package according to instructions on the container, preferably in the refrigerator for several hours. Return the rest of the dough to the freezer for later use.

2. Preheat the oven to 325 degrees. Slice the tomatoes and sprinkle them with sugar, salt, and extra virgin olive oil. Roast for about 2 hours, until they have lost most of their liquid and are just beginning to brown. Take tomatoes out and set aside.

3. Preheat the oven to 450 degrees. Chop each pepper into four pieces and remove the seeds, stem, and white membrane. Toss peppers with olive oil, salt, pepper and seasoning of choice. Arrange on a baking sheet skin down. Roast for about 30 minutes, until peppers are tender and slightly brown around the edges.

4. While peppers are roasting, cut puff pastry into 2 rectangles. Roll each piece into a square. Place the squares on a baking sheet and place in the refrigerator until vegetables are ready.

5. When vegetables are ready, take puff pastry out of the refrigerator. Lower oven heat to 400 degrees. Place vegetables in the puff pastry. Top each tart with shallots, a sprinkle of extra virgin olive oil, and some kosher salt. Fold about 1/2 of the edges of the pastry over the veggies. Back in oven until the pastry is deeply brown, about 25 minutes.


Week 22 -- October 21, 2010

Here is this week's box:


In this week's box: big beef tomatoes, cherokee heirloom tomatoes, golden delicious apples, hungarian hotwax peppers, purple top turnips, red cabbage, red russian kale, romaine lettuce, scunions, sweet corn, sweet peppers. What a bounty! I can't wait to get into the kitchen.

Sunday, October 17, 2010

Tossed Sushi with Sesame Vegetables & Egg

Lately, I have been obsessed with Japanese cooking. I have plowed through many books from the library and stocked up on ingredients from my local Japanese market. There are two dishes I have been wanting to make for awhile. One, is the Japanese omelet or tamagoyaki. The other is tossed sushi or chirashi-zushi. The egg didn't work out the way I had planned so I'll spare you the gory details. But, the tossed sushi was delicious. First, I made the sushi rice. I like Nishiki brand sushi rice. I cook mine in my rice cooker on the sushi setting. But, you can cook it on the stove (see recipe at the bottom of this post). While the rice was cooking I made the veggies.


I blanched some spinach, carrot, and edamame in a pot of boiling water with a bit of soy sauce. After a few minutes, I took the veggies out of the hot water, rinsed them in cold water, and tossed them with toasted sesame seed oil, a bit of rice wine vinegar, and toasted sesame seeds.


I put some sushi rice in the bowl topped with some sliced egg, the sesame veggies, and a bit of avocado. I sprinkled some nori strips and toasted sesame seeds on top.


And, then, the secret weapon -- my homemade ponzu sauce. The ponzu sauce adds a nice saltiness and citrus flavor to the dish. It is easy to make and keeps forever in the refrigerator. Chirasi-zushi tastes like sushi but is a lot easier to make and a very flexible recipe. You can add any type of seasonal veggie or protein you like to this dish. And, making tossed sushi is a good way to practice making sushi rice without the pressure of also making the sushi rolls. It is also a good way to allow picky eaters in your family to build their own meal by putting whatever they like over the rice. You will not believe how easy it is to have a sushi bar experience in your home. Give it a try. I don't think you'll be disappointed.


Sushi Rice


1/4 cup rice vinegar

1 1/2 tablespoons sugar

1 teaspoon salt, plus 1 pinch

2 cups short-grain white rice (I like Nishiki)

2 cups of water

1 teaspoon sake, optional


1. Wash rice in several changes of water until water runs clear. Soak in cooking water for 30 minutes (This step is optional but does make the rice nice and sticky). Combine rice with sake, a pinch of salt, and 2 1/2 cups water (if you’re using a rice cooker) or 3 cups water (if you’re cooking it on stovetop). Cook until water is absorbed, about 38 minutes in a rice cooker, about 25 minutes in a covered pot over medium-low heat.


2. While the rice is cooking, cook the rice vinegar, sugar, and salt in a small saucepan over medium heat until the sugar and salt dissolve in the vinegar. Take off burner and let cool.

3. Turn rice into a large bowl and let cool for 15 minutes.

4. Using a rubber spatula, a wooden paddle or spoon, gently fold sweetened vinegar into rice, a little at a time. Rice should be glistening and moist but not wet, and sweet but not overly so. Use immediately with sushi toppings of your choice.

Yield: Enough rice for 4 generous or 6 small portions of sushi.


Sesame Vegetables

Ingredients

1 bunch of spinach
2 cups of carrots, cut into matchsticks
1 1/2 cups of edamame
1 1/2 - 2 tablespoons soy sauce
2 drops of rice wine vinegar
2 teaspoons of toasted sesame oil
2 tablespoons of toasted sesame seeds

1. Heat a pot of water. When it starts to boil add soy sauce and spinach. Cook spinach until slightly wilted about 3-5 minutes. Take spinach out of the pot with tongs and put in a large bowl.

2. Add carrots and edamame to the pot of water. Bring heat up to a boil. Boil for 3-5 minutes. Take veggies out of pot, place in a strainer, and rinse under cold water.

3. Drain water from the bowl containing the spinach. Add edamame and carrots to the bowl. Sprinkle with toasted sesame oil, rice wine vinegar, and toasted sesame oil. Taste and adjust seasoning as you like.

Ponzu Sauce
from www.4peaks.com

1/4 cup of lemon juice
2 tablespoons rice wine vinegar
5 tablespoons soy sauce
1 tablespoon mirin
1 tablespoon dried bonito flakes (hana-katsuo)
2-inch square dried giant kelp (konbu)

Mix ingredients and let stand for 24 hours. Refrigerate. Keep indefinitely.

Tossed Sushi Put a generous scoop of sushi rice in each of 4 bowls. Top rice with sesame veggies, sliced omelet, and avocado. Sprinkle ponzu sauce, nori strips, and toasted sesame seeds on top.

Friday, October 15, 2010

Week 21 -- October 14, 2010

Here is this week's box:


In this week's box: apples, big beef tomatoes, butter lettuce, candy onions, chives, corn, early girl tomatoes, hungarian hotwax peppers, spinach, summer squash, and sweet peppers. So many possibilities. I can't wait to get into the kitchen!

Thursday, October 14, 2010

Salsa Fresca

I had some tomatoes left over from my last CSA box and a serrano pepper.


I was at the San Mateo Farmer's Market this morning and bought cilantro, lime, and red onion. So, this dish is made of all fresh, local ingredients! Good work, CSA girl!


The important thing about salsa is to keep tasting it and tweeking it until it tastes the way you like it. I like a lot of lime, salt, and cilantro in my salsa.


The only way to really taste the salsa is to dip a chip in it and then adjust the ingredients until they taste right.


You can serve this tacos or you can just eat it from the bowl with chips. Quick, easy, and totally local.


CSA girl confession: Ok, I haven't revealed this in my prior posts; but, I do use my children's place mats as a cutting boards. They are great for this purpose. They are easy to clean, flexible, good for cutting veggies, and fun to look at.

Salsa Fresca
from smittenkitchen.com

2 cups of chopped tomatoes
1/2 large red onion, peeled and minced
1/4 teaspoon minced raw garlic
1 serrano pepper, stemmed, seeded and minced
1/4 cup chopped cilantro
1 tablespoon fresh lime juice
salt and freshly ground pepper

1. Combine all the ingredients; but, only add 1/2 the serrano pepper. Taste (preferably using a tortilla chip) and adjust seasoning to your taste.

2. Let sit for 15 minutes or so before serving to allow the flavors to blend.

Friday, October 8, 2010

Week 20 -- October 7, 2010

Here is this week's box:


In this week's box: broccoli romanesco, collard greens, corn, early girl tomatoes, golden delicious apples, parsley, radishes, salad mix, string beans, summer squash, and sweet peppers. You would think that I would be tired of tomatoes by now; however, I don't think I will ever get tired of these early girl tomatoes. They are amazing! Hmmm, what will I make this week? Check back later and see.

Monday, October 4, 2010

Tacos with Gypsy Peppers, Corn, and Summer Squash

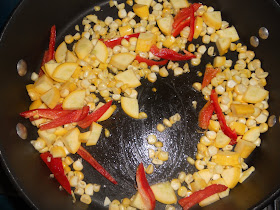
I had some gypsy peppers, corn, and summer squash in my refrigerator along with some Bulgarian feta cheese. And, I thought these ingredients would make a good taco.


I am also currently obsessed with making tortillas at home. I really enjoy making them and they elevate this recipe from just another thrown together meal to something delicious.


My secret to making tortillas at home is not much of a secret. I just follow the instructions on the back of the MASECA bag.


I tried many times to make tortillas, consulting many sources, and just failed miserably. Then, one day I was at the supermarket wondering if I had it in me to try to make tortillas again and that's when I saw the back of the package. I followed these simple instructions and now I can have homemade tortillas any time I want by just adding water and salt to the dry masa and following the instructions.


Of course, you don't have to make the tortillas at home to enjoy these tacos. I topped the sauteed peppers, squash, and corn with some chopped avocado, cilantro, and a squeeze of lemon juice. Yum! Dinner in less than 20 minutes. Just make sure you make a lot of these because everyone will want seconds, thirds, etc.

Tacos with Gypsy Peppers, Corn, and Summer Squash

Ingredients

6-8 homemade or store-bought corn tortillas
2 gypsy peppers, seeded and cut into strips
1 ear of corn, kernels removed
2 small summer squashes, chopped
1 tablespoon butter
1/4 cup of cilantro, chopped
2 avocados, chopped
1 tablespoon of lemon juice
kosher salt

1. Melt butter in a non stick pan over medium high heat. Add peppers, corn and squash. Cook for 5-10 minutes until softened. Sprinkle with lemon juice and season with salt to taste.

2. Meanwhile make tortillas according to MASECA bag or heat store bought tortillas.

3. Top tortillas with sauteed veggies, avocado and cilantro.


Saturday, October 2, 2010

Tomato Fest Continues

So, as you may know, I just received a 20 pound box of Early Girl Tomatoes from Blue House Farm. I thought I would share with you some of the many things I have done with the tomatoes in the last 24 hours. First, I canned many of them (see prior post). I made a simple salad with tomatoes, fresh mozzarella, basil with a little extra virgin olive oil, balsamic vinegar, and salt and pepper.


I also made a bit of bruschetta. I brushed extra virgin olive oil on slices of baguette. Heated the bread. And, topped it with a mixture of tomatoes, garlic, fresh basil, extra virgin olive oil, balsamic vinegar and salt & pepper.


Finally, I made grilled cheese with tomato.


I hope this gives you some ideas of what to do with the beautiful tomatoes that are available right now.

Canning Early Girl Tomatoes

The Tomato Fest here at CSA Girl is in full swing. My first project with these lovely Early Girl tomatoes was to can them.


First, I peeled the tomatoes. In order to peel them, I briefly boiled them in a pot. When I saw the skin on the tomato cracking I put them in a bowl of ice water.


Then, I slipped the skin off with my fingers. I would recommend taking the stems off first; because, when I tried to take off the stems after they were cooked sometimes the whole tomato came out of the skin stuck to the stem.


I boiled the jars, lids and tongs. I also ran my jars and lids through the dishwasher to sanitize them.


I filled each jar with 1 tablespoon of lemon juice and a teaspoon of salt.


Then I filled the jars with tomatoes.


Finally, I added a label. I am craft-challenged so my label looks like a preschooler's mother's day project. But, if you are crafty you could really make your jar look good.


Then, the jars were ready to store or give away. Again, if you are crafty you could make this look really nice, put it in a basket with some pasta, a nice bottle of olive oil, fancy vinegar, a baguette and give it to someone as a gift.

Canned Tomatoes
Taken from Ball Complete Book of Home Preserving by Judi Kingry and Lauren Devine

Note: Before doing any canning you should do some research on food safety regarding canning. It is important that all jars and canning supplies are clean and that the food you canned is properly processed. Ball Complete Book of Home Preserving is a good source for this information. I also like the book Homemade Living: Canning & Preserving with Ashley English.

Ingredients & Equipment

Tomatoes
Bottled lemon juice or citric acid
Salt
Canning Pint-sized Jars
Tongs
Big pot to heat and process jars

1. Prepare jars and lids by running through dishwasher or boiling. Set up a huge pot of hot water to keep the jars and lids hot. Put ice water in a large bowl to immerse tomatoes after they have been boiled.

2. Working in small batches, immerse tomatoes in a second pot of boiling water for 60 seconds or until the skins start to loosen and crack. Immediately plunge into a bowl of cold water and slip skins off.

3. Before packing each jar of tomatoes add 1 tablespoon of bottled lemon juice and 1/2 teaspoon of salt to the hot jar.

4. Pack tomatoes into prepared jars within a generous 1/2 inch of the top of the jar. Press the tomatoes into the jar until the space between them fills with juice, leaving 1/2 inch space at top of jar. Remove air bubbles and adjust headspace (area at top of jar), if necessary, by adding more tomatoes. Wipe rim. Center lid on jar. Screw band down until resistance is met, then screw lid on tight.

5. Place jars in canner, or large pot of boiling water, ensuring they are completely covered with water. Bring to a boil and leave jar in canner or pot of boiling water for 85 minutes. Remove jars, cool and store.

Friday, October 1, 2010

Week 19 -- September 30, 2010


Here is this week's box:


In this week's box: artichokes, corn, early girl tomatoes, heirloom tomatoes, green leaf lettuce, golden beets, golden delicious apples, cippolini onions, lacinato kale, poblano peppers, summer squash.


Blue House Farm had some extra tomatoes; and, I ordered an extra 20 pound box of Early Girl tomatoes. So, you can expect a total tomato fest this week. I'm planning on canning some of these Girls and making a huge batch of tomato sauce. Check in later this week to see what I've done.