Wednesday, June 30, 2010

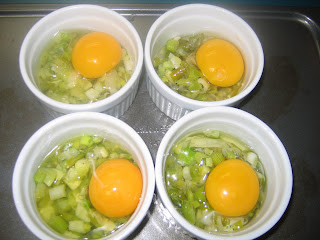
Eggs in Cocotte with Leeks

Don't let the fancy-sounding name fool you. This is a very easy dish to prepare and only has a few ingredients. You just cook leeks, put them in a ramekin, and then crack eggs over them and bake the whole thing in the oven.


If you don't have ramekins, I think you could just make this dish in a pan on your stove. You could cook the leeks in butter on the stove, crack eggs over the cooked leeks, cover and cook until the eggs are done the way you like them. Though, I have to say, the ramekins make a nice presentation. I'm not a big proponent of buying all kinds of kitchen equipment; but, I think ramekins are a nice investment. They are inexpensive and they make this dish and even a simple chocolate pudding look dressed up.


I think that it is a shame that most people think of eggs as a breakfast food. This egg dish (and many others) makes a great dinner. I served the eggs with some rainbow chard that I sauteed with garlic, olive oil, and red pepper flake; and, some pan roasted potatoes.


I got this dish from The Silver Spoon Cookbook. This cookbook is a classic in Italy; and, a bit overwhelming (there are 1200 pages). But, it is full of good and simple recipes like this one.

Eggs En Cocotte with Leeks

Ingredients:

1 pound of leeks, washed and trimmed
1/4 cup of butter
pinch of freshly ground nutmeg
4 eggs
salt and pepper

Halve the leeks lengthwise, then slice them very thinly. Melt the butter in a skillet, add the leeks and cook over low heat, stirring occasionally for 5 minutes until softened. Season with salt and pepper to taste and sprinkle with the nutmeg. Stir well and add 3 tablespoons warm water, then cover and cook on low heat for about 20 minutes. Meanwhile, preheat the oven to 350 degrees and grease four ramekins with butter. Divide leeks among the ramekins, break an egg into each dish and bake for 8-10 minutes depending on how well done you like your eggs.

Sunday, June 27, 2010

Preserved Lemons

Preserved lemons are very easy to make and add a nice citrusy flavor to soups, salads, stews, braises, ice cream, anything really. There are only two ingredients -- lemon and salt. The traditional recipe requires the lemons to be in the jars for several months before you can use them.


I found an easier recipe in the book Seriously Simple: Easy Recipes for Creative Cooks by Diane Rossen Worthington.


In this recipe, you freeze the lemons with their juice and kosher salt overnight and the lemons are ready to use the next day.


The extra lemons can be put in a jar and kept in the refrigerator for up to 6 months.


Overnight Preserved Lemons

Ingredients

12 large lemons, scrubbed
Kosher salt

1. Juice 6 lemons and set the juice aside.
2. Partially quarter the remaining lemons so that they stay together at the stem.
3. Pack about 2 teaspoons of salt into the center of each lemon. Re-form the lemons and place in a large zip-t0p plastic bag. Cover the lemons halfway with salt. Add the reserved juice. Pack the lemons tightly in the plastic bag, squeeze out any air, and close the bag. Freeze overnight.
4. Remove the lemons from the freezer, defrost, and use for cooking. Pack the unused lemons and with their salt and juice into a mason jar. Make sure there is enough lemon juice and salt to cover them. Refrigerate until using. Rinse off the salt and proceed with cooking. May be kept in the refrigerator for 6 months.


Spicy Root Vegetable Tagine with Preserved Lemons and Olives

I had a bunch of root vegetables this week (turnips, carrots, and potatoes) and I wanted to do something special with them.


Epicurious had a recipe for Spicy Potato Tagine with Preserved Lemons and Olives by Paula Wolfert. Since, I had some turnips and carrots I decided to add those for some extra flavor and color. You could make this with just potatoes or add other hearty vegetables you have. I think winter squash, sweet potatoes, or eggplant would be nice additions to this dish. And, don't let the term tagine freak you out. You don't need a special pot. I used a regular pan. Just think of tagine as Moroccan for delicious.


I served this lovely tagine with some couscous. I have never made couscous before; but, I read that it is traditionally served with Moroccan food. The couscous was very easy to make (I just followed the recipe on the box). And, it went well with the tagine.


A note about the preserved lemon. I made my own preserved lemons for this dish. I will give you the recipe in my next post. It is super easy and they keep for 6 months in your fridge so it is worth the effort. If you don't feel like making preserved lemons you can just add some lemon juice and zest at the end.


Spicy Root Vegetable Tagine with Preserved Lemons and Olives

Ingredients

1 pound new potatoes
6 turnips, peeled and chopped
2 carrots, peeled and sliced into disks
2 onions, thinly sliced
3 tablespoons extra virgin olive oil
1 tomato, chopped
1/4 teaspoon ground ginger
1/4 teaspoon hot Hungarian paprika
pinch of ground cumin
pinch of cinnamon
1 clove of garlic, chopped
1/4 fresh lemon
2 tablespoons of chopped flat-leafed parsley
2 tablespoons of chopped cilantro
salt
a generous pinch of saffron
1 1/2 cups chicken or veggie stock
24 kalamata olives, pitted
1/2 preserved lemon, chopped

1. Scrub the potatoes and thickly slice into a bowl of cold water.
2. In a heavy saucepan over moderate heat, cook one of the onions in olive oil until it is softened. Add the tomato, ginger, paprika, cumin, garlic, and cinnamon. Cook, stirring, for 2 minutes.
3. Drain the potatoes and add them to the pan along with the turnips and carrots. Add the other onion and the fresh lemon quarter. Toss to coat the potatoes, onion, and lemon with the parsley, cilantro and salt to taste.
4. Heat the chicken broth in a separate little saucepan and add the saffron into it so they saffron can bloom.
5. Add the saffron and hot broth to the pan with the potato mixture. Bring the pan to a boil. Cover the pan and reduce to a simmer. Cook until the vegetables are tender about 40 minutes. 6. Remove the vegetables from the pan and leave the broth and spices in the pan. Add the olives and bring to a boil. Cook at high heat until the broth reduces to a thick sauce. Pour the sauce over the vegetables and garnish with the preserved lemons.


Friday, June 25, 2010

Week 5

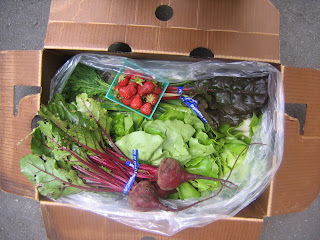
This week my CSA box is packed with a ton of good stuff. There is basil, broccoli, carrots, chard, leeks, new potatoes, romaine lettuce, turnips, and 2 baskets of strawberries. A rainbow of vegetables and fruit.


Ah, what to do with this bounty? I'm thinking that I may make a tagine and a savory tart of some sort. Check in later this week and see what happens. Or, if you have any ideas please let me know. I love getting recipe ideas from my friends.

Tuesday, June 22, 2010

Bok Choy Stir Fry

I got this recipe from The Steamy Kitchen website. I have to admit that I have had some bok choy mishaps. In the past, my bok choy has been flavorless or soupy and just plain unappetizing. But, I was attracted to this recipe because Jaden Hair (the women behind The Steamy Kitchen) totally knows what she's doing and the recipe was quick and had a short list of ingredients.


I made some slight modifications to The Steamy Kitchen bok choy recipe. I decided to separate the leaves from stems and chop them up. I have found this to work with other types of greens. I thought this would make them cook quicker and make them easier to eat. I also added a pinch of red pepper flakes to the garlic because I like a little kick to my greens.


I turned this simple stir fry into a full meal by putting the stir fried bok choy on top of a bed of rice with a fried egg. I sprinkled it with a bit of chilli garlic sauce, toasted seasame oil, and soy sauce. This is not your typical meat and potatoes meal. But, it is very healthy and very satisfying. I hope you give it a try. You will not be sorry.


Boy Choy Stir Fry

Ingredients

2 heads of bok choy
1 1/2 tablespoons sesame oil
3 cloves of garlic
3 tablespoons chicken broth (or vegetable broth)
1 pinch of red pepper flakes
salt to taste
1 teaspoon toasted sesame oil
2 teaspoons soy sauce

Start by trimming the stem off the bok choy. Separate the leaves from the stems and chop the leaves and stems into 1/2 inch pieces. Finely minch the garlic with a microplane grater. Place wok or frying pan on your stove and pour in the sesame oil. Add garlic and red pepper flakes. Turn the heat to medium-high. Let the garlic and red pepper flakes sizzle in the oil. When the garlic and red pepper become fragrant add the bok choy leaves and stems. Toss very well to coat the leaves and stems with the oil mixture. Pour in broth, cover, and lower to a simmer. Let cook for 5 minutes. Season with salt, toasted sesame oil, and soy sauce.

If serving with rice and egg

Take one scoop of rice and put it on a plate. Put greens to the side of the rice and place a fried egg (or two) on the other side of the rice. Sprinkle with chilli garlic sauce, toasted sesame oil, and soy sauce to taste.

Sunday, June 20, 2010

Collard Greens with Chorizo


When I saw the collard greens in my box I knew that I would have to consult with my friend, Aeron. Aeron is an amazing cook, an avid gardener, and she's from the South. This woman knows how to cook greens. So, I sent her a text message and asked her how to cook greens. She responded, "Braise them with onions (and pork fat if southern style) or chicken broth. They can cook for hours."


I did a quick inventory of what I had on hand. I had chicken broth, spring onions, and no bacon. But, I did have some chorizo leftover from a paella I made the night before. Chorizo! Ah, yes, of course. Why hadn't I thought of this before? Chorizo has a rich pork flavor and a nice hot spiciness that would be perfect for greens.


I took the casing off the chorizo, chopped it, and cooked the pan until the pan was coated in all that nice chorizoness. By the way, I did see some soy chorizo at Trader Joe's the other day. So, if you want to make this a vegetarian dish I think you could use the soy chorizo. If the soy chorizo doesn't add enough grease to the pan I think you could add a bit of olive oil.


I added the rest of the ingredients and let the flavors join together. As I stood at the stove, I realized that I probably am not the first to think of putting chorizo with greens. But, I can't believe I hadn't thought of this before!


I let the whole thing cook for an hour. I couldn't wait any longer. I needed to taste this. It was good! I highly recommend that you try this recipe. It is spicy, meaty, and full of vitamins. This would be a good dish to make for someone who doesn't think that they like greens.

Collard Greens with Chorizo

Ingredients

1 tablespoon of olive oil
1 chorizo sausage (or 1 soy chorizo)
1 head of collard greens, stems separated from leaves
1 spring onion (or yellow onion), chopped
1 1/2 - 2 cups chicken stock (or vegetable stock)

Heat the olive oil in a pan over medium high heat. Take the casing off the chorizo and chop it. Add chorizo to the pan and brown it. Take the chorizo out of the pan and reserve in a bowl for later. Add the onion and cook it in the olive oil and chorizo fat until it is soft. Add the greens and coat with the oil mixture. Sprinkle the greens with salt. Add the chicken stock and make sure that the greens are mostly covered in liquid. Cover and reduce heat to a simmer. Cook the greens for at least an hour. They can cook for hours. Add chorizo back into the pan, sprinkle with salt, and serve.

Friday, June 18, 2010

Week 4

Here's my box for this week:


There are collard greens, butter lettuce, carrots, pac choi, leeks, red spring onions, salad mix, and 2 (yes 2) baskets of strawberries. I think I see some stir fries in my future. And, I love the collard greens! It looks like another delicious week. Check back later this week to see what I make.

Wednesday, June 16, 2010

Turnip and Tomato Curry

If a beet, a radish, and a potato had a baby it would be a turnip. This root vegetable is sweet, spicy and starchy. It adds texture, flavor, and meatiness to any dish. Sadly, the turnip suffers from its association with Beatrix Potter's Peter Rabbit. We all picture Peter with that turnip in his mouth running from Farmer McGregor. Yuck! Well, I ask you dear reader to give this neglected vegetable a chance.


This curry is very simple and doesn't have a ton of ingredients which makes it good for a quick weeknight meal.


The garlic, ginger, onion and spices will make your kitchen smell delicious. The spices and aromatics combine nicely with the roasted tomatoes, turnips, and potatoes.


To finish, sprinkle a bit of cilantro on top and serve the curry on a bed of basmati rice. Delicious! I promise you this dish will make you reconsider the turnip.

Turnip and Tomato Curry

Ingredients

2 tablespoons vegetable oil
1 large onion, thinly sliced
1/2 teaspoon fresh ginger, finely chopped
1/2 teaspoon fresh green garlic, finely chopped (regular garlic is fine, also)
1 teaspoon ground cumin
1 teaspoon ground coriander
1 14 ounce can Muir Glen Fire Roasted Whole Tomatoes
1/2 teaspoon turmeric
2 teaspoons curry powder
2/3 cup water
1 1/2 cups fresh turnips, peeled and diced
1/2 cup of potatoes, peeled and diced
1/2 teaspoon brown sugar
salt to taste
1/2 cup cilantro leaves, roughly chopped

Heat oil in a heavy bottomed pan over medium high heat. Add onions and cook until golden. Add ginger and green garlic and cook for about 30 seconds or until fragrant. Sprinkle the ground cumin, coriander, and curry powder over the onions and cook for 30 seconds. Pour in tomatoes, the turmeric and water. Stir to thoroughly combine. Add the turnips and potatoes. Bring to a boil, cover, and then bring down to a simmer. Cook until the turnips and potatoes are soft (about 30-40 minutes). Sprinkle with sugar and salt to taste. Stir in cilantro. Enjoy!

Monday, June 14, 2010

Green Garlicky Tofu and Spinach

I got this recipe from The Steamy Kitchen Cookbook by Jaden Hair (she also has a great website and blog also called The Steamy Kitchen). When I saw a large bunch of spinach in my CSA box last Thursday I knew I had to try it out.


The ingredients are fairly simple as is the technique. I used green garlic instead of the regular garlic that was in Jaden Hair's recipe; because, I had a bunch of green garlic from last week's CSA box and I wanted to see how it would taste in comparison to garlic. The flavor was garlicky but a more delicate garlicky flavor. It tasted a bit grassier -- like spring in garlic form.


Just before digging in, I added a little more soy sauce and some chilli garlic sauce to taste. I love the prepared chilli garlic sauce that you can buy in the Asian section of most grocery stores and in Asian markets. It is so good that I fear that one day I will skip making the food and just eat the chilli garlic sauce from the jar with a spoon.


Anyway, I hope you enjoy this simple healthy dish.

Green Garlicky Tofu and Spinach

Ingredients:

1 1/2 tablespoons soy sauce (plus more at the end to taste)
1 teaspoon cornstarch
2 tablespoons water
1 teaspoon toasted sesame oil
1 dash of ground black pepper
1 dash of sugar
1 teaspoon high heat cooking oil
3 cloves green garlic
1/2 lb spinach
salt to taste
One 16 oz block of extra firm tofu, cut into 1 inch cubes
1 green onion, sliced

In a small bowl, mix together soy sauce, cornstarch, water, toasted sesame oil, pepper and sugar. In a wok or large frying pan, add the cooking oil and green garlic and turn heat to medium-high. Heat oil until garlic is fragrant. Add spinach to the pan and mix the garlicky oil all over it. Sprinkle salt over the spinach and cook for 30 seconds. Add tofu cubes and pour the soy sauce mixture over. Turn the heat to low and let cook for 1 minute. Add soy sauce and chilli garlic sauce to taste. Sprinkle green onion on top. Enjoy!

Friday, June 11, 2010

Week3

Here is my box for this week:


In this box are strawberries, purple top turnips, spinach, red leaf lettuce, romaine lettuce, yellow spring onions, red russian kale, dill, and cilantro.

I also got these lovely eggs from Pie Ranch:


Tune in later this week to see what I make with these beautiful local ingredients. It looks like it is going to be a delicious week!

Wednesday, June 9, 2010

Rainbow Chard -- The Beauty Queen of the Greens

Many books on local vegetables feature a gorgeous color photo of rainbow chard on their cover. Who can blame them? Look at this beauty queen.


Rainbow chard is beautiful, easy to cook, and it goes well with other food. I like to quickly saute my greens. So, first, I separate the leaves from the stems.


I saute them in a pan with olive oil, garlic, and red pepper flakes. At the end, I like to sprinkle salt and lemon juice over them to taste. Check out that tasty pan of greens! Who wouldn't want to be looking at that at the end of a hard day?


Sauteed rainbow chard goes well with many other dishes. I like to serve these greens on a bed of polenta nuzzled next to a fried egg. They are also good tossed with a long pasta or as a side for a grilled steak. Or, you can just eat them out of the pan with a fork or your hands. I admit that this pan of greens was eaten out of the pan with a fork and some fingers.

Sauteed Rainbow Chard

Ingredients:

1 bunch of rainbow chard
1 tablespoon of olive oil
1 clove of chopped garlic
1 dash of red pepper flakes
salt
1 slice of lemon

Separate the leaves from the stems. Heat the olive oil in a pan over high heat until the oil is shimmering and hot. Add the garlic, cook for a few seconds until fragrant. Then add the red pepper flakes. Add the rainbow chard leaves and coat them with the oil mixture. Put a lid on the pan and cook for 3 minutes. Take off lid and cook for 3 more minutes until the greens are wilted. Take pan off heat. Sprinkle salt on greens to taste. Squeeze the lemon over the greens. Taste to see if they need more salt or lemon. Enjoy!


Sunday, June 6, 2010

Chilled Potato Leek Soup

You can also call this soup vichyssoise if you are having a fancy dinner party; or, you just want to make it sound more enticing then cold potato soup. According to Wikipedia there is a debate about the origins of this soup -- it sounds French but it probably isn't really French. French, American, vichyssoise, potato soup; whatever, it is just plain good and perfect for a summer night.

I have never made this so I consulted various recipes. Some recipes included garlic or heavy cream or half and half. I tried some soup with some Mexican crema; because, I didn't have any heavy cream in the house. I thought the crema made the soup too heavy. I decided not to use any cream or milk product and just let the creaminess of the potatoes give the soup a creamy consistency without the milky flavor. I used a clove of garlic; because, I think garlic makes everything better. But, if you don't like garlic you can drop it from the recipe and have a soup where you really taste the leeks.

So, here's what I did. First, I got together my ingredients:


For the soup:
4 leeks
1 clove of garlic
2 potatoes
1 tablespoon of butter
1 tablespoon of olive oil
salt and pepper
4 cups of chicken broth

For garnish:
1 scallion
high quality olive oil for drizzling

So, then I prepped my ingredients. The most important thing here is to properly prepare your leeks. You need to pull off all the dark green rough leaves. Then cut the leeks in half lengthwise and soak in water to get rid of dirt. They should look like this:


Then, chop the leeks. Peel and chop your potatoes to roughly the same size as the leeks. Mince the clove of garlic. Heat the butter and olive oil in a pot over medium high heat. Add the leeks and the garlic. Add salt and pepper. When the leeks have softened add the potatoes.


Then, add the broth. Turn up the heat until the broth starts to boil; then, put the heat down to a simmer. Simmer for 30 minutes. Check the potatoes to make sure they are soft and mushy. When the potatoes are ready take the pot off the burner. You can use a hand held blender or a regular blender to then puree the soup. You can leave it a bit lumpy if you like it that way or blend to smooth if you like. Then add salt and pepper to taste.


Put soup in serving dishes. At this point, you can add cream, yogurt, crema or some other dairy product if you want some extra creaminess. I simply drizzled some high quality olive oil on the soup and scattered some scallions on top. This soup was really good and super easy to make. I highly recommend giving it a try.

A note about olive oil. I used two different types of olive oil in this dish. I used an inexpensive olive oil to saute the leeks and garlic. Then, at the end, I used a higher quality olive oil to just drizzle on top. I like to have both kinds of olive oil in my kitchen - one for cooking and another for drizzling or making salad dressings.
E-mail me! Please let me know what you have been making with the veggies in your CSA box. I look forward to hearing about all the delicious meals you've made with your local veggies. My e-mail address is csagirlcal@gmail.com.

Thanks for reading my blog. I'll be back soon!


Thursday, June 3, 2010

Week 2

I just picked up my box for Week 2. Here it is:


In this week's box there are: strawberries, rainbow chard, cherry bell radishes, scallions, dill, green garlic, green leaf lettuce, butter lettuce, leeks, and beets. Strawberries! Sorry, I won't have any more photos of Blue House Farm's beautiful strawberries because they were swiftly devoured. However, I promise to come back later in the week and show you what I did with some of these other beautiful veggies. See you soon!

Tuesday, June 1, 2010

In Praise of the Green Salad

The green salad was once a dinner standby -- a must for any complete meal. But, this former grande dame of dinner table has been shoved aside by her flashier sisters -- the caesar salad, mesclan with a round of goat cheese, the composed salad.

There are also the issues of time and energy. I admit that on many a night I would notice the salad greens in the refrigerator and think to myself -- my god, I don't have the energy to make a salad. But, that was before I discovered the dressing-in-a-bowl simple salad recipe in a wonderful book called The Splendid Table's How to Eat Supper. I discovered that to make a green salad you need one bowl, 5 ingredients, and about 5 minutes.

First of all, you need olive oil, red wine vinegar, salt and pepper. It is good to splurge on olive oil and vinegar for this recipe. But, you can also use inexpensive super market products and still have a good salad. Also, I like to use kosher salt and freshly ground pepper.


And, of course you need salad greens. CSA girl recommends fresh greens from a local farmer that you received in your CSA box. To make the salad just wash and tear the greens into the size you like. Then, sprinkle the greens with salt and pepper. Finally, drizzle the greens with 2 tablespoons of olive oil and 1 tablespoon vinegar. That's it!


A green salad makes every meal just a little bit better. Simple meals like a frittata, a sandwich, and even homemade macaroni and cheese will be transformed from kiddie fare to something you would expect on the menu at Chez Panisse Cafe. Trust me. Just try making this salad for one week and you will notice that simple family meals are just a little more special.

That's all for now. I'll be back later this week when I get my next box from the farmers at Blue House Farm.